Bake Perfect Chocolate Chip Scones: Chill for Tall, Tender Results
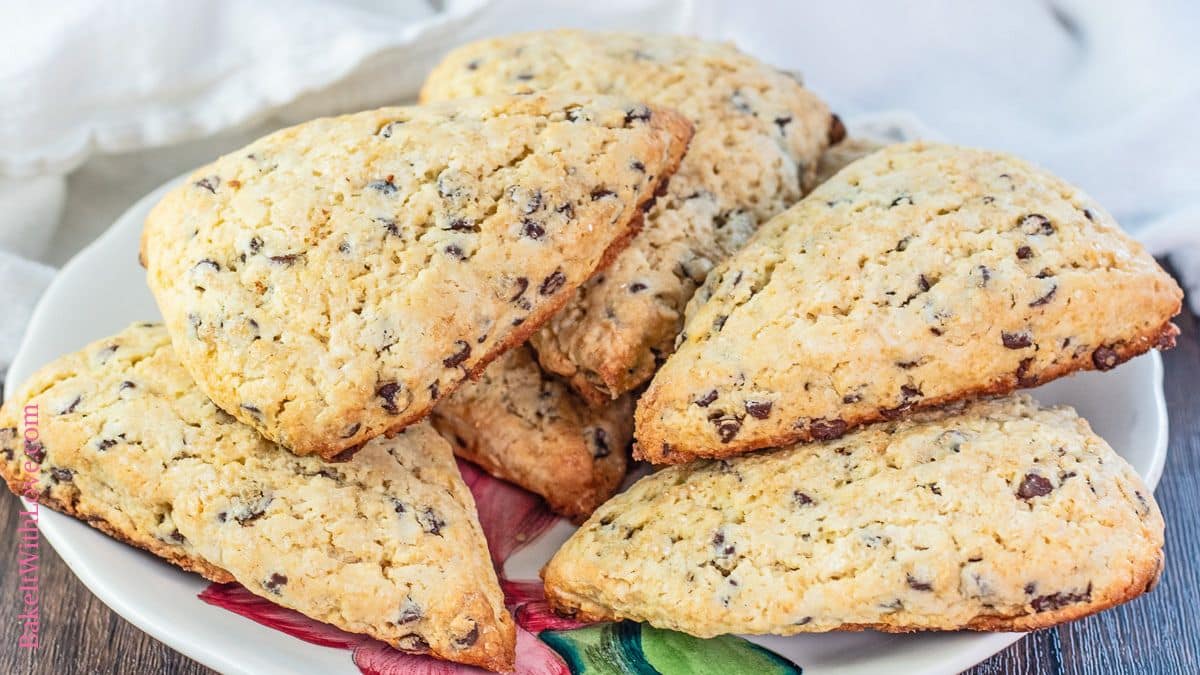
Imagine waking up to the irresistible aroma of freshly baked goods, a hint of sweet chocolate mingling with buttery goodness. For many, this isn't just a fantasy reserved for holidays, but an "everyday joy" made possible by the humble yet magnificent scone. Specifically, we're talking about the pinnacle of breakfast indulgence: **chocolate chip scones**. Forget those dry, crumbly imposters; we're aiming for bakery-worthy creations that are tall, boast a crisp exterior, and reveal an incredibly tender, moist, and buttery interior. The secret to achieving this delightful balance, preventing your scones from spreading into flat discs, lies in one crucial, yet often overlooked, step: chilling them before baking.
There's a unique satisfaction in pulling a batch of perfectly risen, golden-brown chocolate chip scones from the oven. These aren't just a British classic; they’re a versatile treat that transforms any morning into a special occasion, serves as an exquisite accompaniment to tea, or becomes a comforting snack on the go. While many find themselves reaching for chocolate chip cookies, switching up your baking repertoire to include these easy-to-make scones offers a delightful change of pace, delivering all the deliciousness of biscuits with an added touch of sweetness. The beauty of baking **chocolate chip scones** is how quickly they come together, making them an ideal choice for a spontaneous morning treat without the lengthy proofing times required by other yeasted doughs. For more inspiration on making these delightful treats, explore our guide to
Easy Chocolate Chip Scones: Buttery, Tender & Pure Everyday Joy.
The Simple Magic of Homemade Chocolate Chip Scones
What makes a truly exceptional **chocolate chip scone**? It’s a symphony of textures and flavors. We’re looking for a scone that holds its shape beautifully – tall and proud – with a slightly crisp, golden-brown crust that gives way to a soft, fluffy, and richly buttery crumb. Crucially, it must never be dry. The sweetness should be just enough to complement the chocolate chips without being cloyingly sugary, ensuring each bite is a balanced pleasure. This ideal scone is sturdy yet moist, capable of being enjoyed on its own or with a light smear of butter or jam.
One of the most appealing aspects of scones, particularly the chocolate chip variety, is their inherent simplicity and adaptability. They typically rely on pantry staples: flour, sugar, baking powder, salt, butter, and a liquid like milk or cream. This simple base becomes a canvas for endless possibilities. While blueberries, cinnamon chips, or dried cranberries are popular choices, **chocolate chip scones** undeniably hold a special place in many hearts – especially with kids. The ease of preparation makes them a perfect last-minute breakfast surprise compared to more time-intensive bakes like cinnamon rolls that require significant rising time or French toast cooked slice by slice. You can even divide your dough to accommodate different preferences, making half with chocolate chips for the sweet tooths and half with another favorite for variety.
The Secret to Tall, Tender Scones: The Power of the Chill
If you've ever baked scones only to find them spreading into flat, amorphous blobs rather than rising into majestic, flaky towers, then you've encountered the very problem that chilling solves. The single most important tip for achieving those enviably tall, neat, and wonderfully tender scones, as shared by seasoned bakers, is to chill or even freeze them before baking. This isn't just a suggestion; it's a game-changer rooted in the science of baking.
Why Chilling is Non-Negotiable for Perfect Scones:
- Butter Preservation: Scones rely on cold butter. When butter melts slowly in the oven, the water content in it turns to steam, creating pockets that separate the layers of dough. This is what gives scones their characteristic flakiness. If your scone dough is warm, the butter melts prematurely *before* it hits the hot oven, leading to a flatter, denser scone where the butter may even leak out, resulting in a greasy texture. Chilling ensures the butter remains solid until it enters the high heat of the oven, allowing for maximum steam creation and rise.
- Flour Hydration and Gluten Relaxation: Just like with pie crusts, giving the dough time to rest and chill allows the flour to fully hydrate. This process, often overlooked, results in a more tender crumb. Simultaneously, chilling allows the gluten that developed during mixing to relax. Overworked or unrelaxed gluten can lead to tough scones, but a good chill helps mitigate this, ensuring a soft, delicate interior.
- Shape Retention: A cold dough is a firm dough. When your scones are well-chilled, they are less likely to spread out horizontally when they hit the hot oven. Instead, the firm dough encourages the leavening agents (like baking powder) to push the scones upwards, giving you that desirable tall, proud rise.
Even a mere thirty minutes in the freezer can make a noticeable difference in how tall, neat, and tender your **chocolate chip scones** turn out. For the best results, aiming for an hour in the refrigerator or 20-30 minutes in the freezer is ideal.
Beyond the Basics: Tips for Next-Level Chocolate Chip Scones
While chilling is paramount, several other elements contribute to truly exceptional **chocolate chip scones**:
- Start with Cold Ingredients: This extends beyond just butter. Ensure your milk or cream is also very cold. This helps maintain the temperature of the dough, keeping the butter from softening too quickly during the mixing process.
- Don't Overmix: Overworking the dough develops gluten excessively, leading to tough scones. Mix until just combined; a few lumps are perfectly fine. Remember, a light touch is key for tenderness.
- Gentle Handling: When bringing the dough together and shaping, use minimal pressure. Pat the dough gently rather than rolling aggressively.
- Sharp Cuts: Whether you're cutting circles with a cookie cutter or wedges with a knife, make clean, decisive cuts. Avoid twisting the cutter, which can seal the edges and inhibit rise. For wedge shapes, a sharp chef's knife or bench scraper is best.
- Brushing for Golden Tops: A quick brush of egg wash (egg beaten with a splash of milk or water) or simply heavy cream before baking will give your **chocolate chip scones** a beautiful golden-brown, shiny crust.
- Hot Oven is Your Friend: Scones bake best in a hot oven (usually 400-425°F or 200-220°C). The initial blast of heat helps them rise quickly and create that crispy exterior.
- Quality Chocolate: Use good quality chocolate chips that you enjoy eating on their own. The type of chocolate chip (milk, semi-sweet, dark) is a personal preference, but quality makes a difference in flavor.
- A Pinch of Salt: Don't skip the salt in the recipe. It balances the sweetness of the chocolate and enhances all the other flavors, preventing the scones from tasting bland.
Smart Scone Prep: Freeze for Future Feasts
One of the most genius aspects of **chocolate chip scones** is how wonderfully they adapt to freezer meal prep. This strategy is perfect for those who don't need a whole batch of 12 scones at once or for anyone who craves an instant sweet breakfast treat without the morning fuss.
How to Freeze Unbaked Scones:
- Shape and Arrange: After shaping your scones (whether cut into circles or wedges), arrange them in a single layer on a parchment-lined baking sheet. Make sure they aren't touching.
- Flash Freeze: Place the entire baking sheet into the freezer. Flash freezing them individually prevents them from sticking together once transferred to a bag or container.
- Store: Once the scones are frozen solid (this usually takes 1-2 hours), transfer them to a freezer-safe bag or airtight container. Label with the date. They will keep well for up to two months.
- Bake from Frozen: When you're ready for a fresh scone, simply pull however many you need from the freezer. There's no need to defrost them! Place them on a baking sheet and bake directly from frozen, adding an extra two to four minutes to the usual baking time to account for their frozen state. This is an incredible convenience that allows for an impromptu special breakfast anytime you desire. For more detailed instructions on freezing your scones for later, check out Quick Chocolate Chip Scones: Freeze for Easy, Anytime Breakfast Treats.
This method not only simplifies busy mornings but also ensures you always have a stash of bakery-quality treats ready to bake, minimizing waste and maximizing joy.
Baking perfect **chocolate chip scones** is a deeply rewarding experience, transforming simple pantry ingredients into something truly special. By embracing the crucial step of chilling your dough before baking, coupled with a few other mindful techniques, you'll consistently achieve those coveted tall, flaky, and tender results. Whether it's for a quiet morning, a family brunch, or a delightful afternoon tea, these homemade treats are guaranteed to bring a smile to every face. So go ahead, whip up a batch, chill them, and prepare to enjoy the sweet, buttery perfection that is a perfectly baked chocolate chip scone.